Enabling 1000hz QMK Polling
I was playing some osu!mania with my newly delivered NK65 keyboard and discovered pretty quickly that something was wrong. The spacing of notes in the hit error bar looked awful, everything felt really bad.

When trying to fix this myself I saw little on google regarding specifically how to fix this from a novice perspective, so here is a pretty simple explainer on how to fix this.
Things you will need:
- QMK MSYS
- QMK Toolbox
- A text editor of your choice – I use VSCode
Once QMK MSYS has been downloaded and installed, Launch it and run qmk setup. This will download the full QMK git repo to your machine.
Browse to your keyboard folder in the folder QMK MSYS downloaded, in my case it was
qmk_firmware\keyboards\nk65
In here there is a folder called “keymaps”
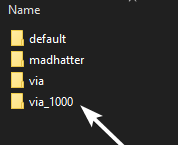
Copy the keymap that you would like to keep, I copied the via one in my case as I would like to keep the VIA support, I called the copied folder “via_1000”

In the new folder you copied, create a new file called config.h and place the below text into it.\
/_ Change USB Polling Rate to 1000hz and a larger keys per scan for elite gaming_/
#define USB_POLLING_INTERVAL_MS 1
#define QMK_KEYS_PER_SCAN 12
Save this file, Next we will need to build the firmware file. To do this, we can run the command
qmk compile -kb <keyboard name> -km <keymap name>
In my case this looked like
qmk compile -kb nk65 -km via_1000
After this compiles, you will get the below message

We can now move onto the flashing process!
Boot up QMK Toolbox and select your firmware file

Put your keyboard into DFU mode, This will differ for different keyboards, check your vendor for this QMK Toolbox should detect your keyboard and display a message like
STM32 DFU device connected (WinUSB): STMicroelectronics STM32 BOOTLOADER (0483:DF11:2200)
We are almost there. Click Flash and you will see your keyboard begin the process. After this, you should be done!
 bleat.club